Dish washer: Difference between revisions
No edit summary |
|||
| (78 intermediate revisions by the same user not shown) | |||
| Line 2: | Line 2: | ||
====Symptom==== | ====Symptom==== | ||
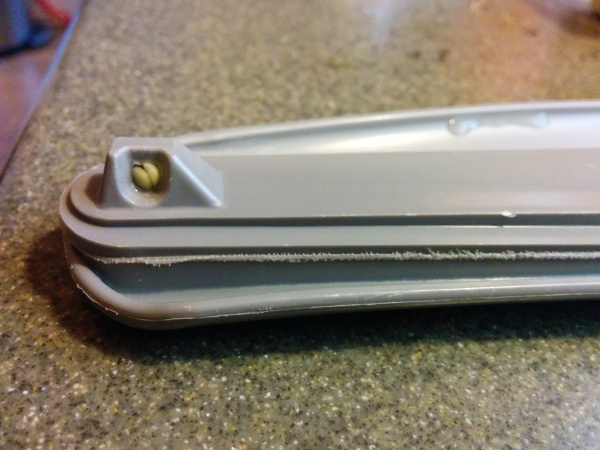
The dish washer mostly works. However, it frequently will fail to wash the top rack. When this happens, I can take off the rotating | The dish washer mostly works. However, it frequently will fail to wash the top rack. Furthermore, the dishes on both racks sometimes come out dirtier than when they went in. When this happens, I can take off the rotating spray arms which will be clogged with food particles. There are three spray arms: the largest is on the bottom, below all the dishes, one between the two racks, and the smallest one above all the dishes. The clog is generally at the end of the arm in the jet that should provide the force to spin the arm. These clogs happen after almost every wash. | ||
I've tried to fix this before, and my first round of googling turned up the possible cause of broken glass in the bottom of the dish washer. And that was true. I cleaned out a bunch of broken glass. | {| border="0" cellspacing="0" cellpadding="5" align="left" | ||
|[[File:clog.jpg]] | |||
| A clog in the middle spray arm that normally shoots up into the top rack. | |||
|- | |||
|[[File:upclog1.jpg|200px]][[File:upclog2.jpg|200px]][[File:upclog3.jpg|200px]] | |||
| The top-most spray arm clogged with food. This spray arm is the most difficult to remove as it requires a 1/4 inch wrench. | |||
|} | |||
With some effort the clogs can be removed and the top rack will get cleaned again. But the real problem is that food chunks are not getting filtered out properly. | |||
I've tried to fix this before, and my first round of googling turned up the possible cause of broken glass in the bottom of the dish washer. And that was true. I cleaned out a bunch of broken glass. But that didn't fix the problem. | |||
We've even called out a service tech and spent a bunch of money for him to clean the filter at the bottom (removing a bunch of paper stickers like the kind that are on fruit from the grocery store). But that didn't fix the problem. | |||
====Make and model==== | ====Make and model==== | ||
[[File:dish-washer.jpg|900px]] | [[File:dish-washer.jpg|900px]] | ||
Model: PDW9280J00SS | |||
Serial: VF821142B | * Model: PDW9280J00SS | ||
* Serial: VF821142B | |||
====Parts==== | |||
* Sears Parts has diagrams and parts lists online: | |||
http://www.searspartsdirect.com/partsdirect/part-model/GE-Parts/Dishwasher-Parts/Model-PDW9280J00SS/0432/0130000 | |||
* GE has an official parts page for this model of dishwasher: | |||
https://www.geapplianceparts.com/store/parts/assembly/PDW9280J00SS | |||
====Recall==== | |||
A quick search shows that our model is part of a recall: | |||
http://www.cpsc.gov/en/Recalls/2011/GE-Recalls-Dishwashers-Due-to-Fire-Hazard/ | |||
Filling out this form: | |||
http://www.geappliances.com/products/recall/dishwasher_2010/ | |||
We get this message: | |||
<pre> | |||
Safety Recall | |||
GE Dishwashers - October 2010 Recall | |||
Your dishwasher is included in the recall. | |||
Based on the information you submitted, you have two options (please choose one): | |||
1. Replace your dishwasher using a GE rebate offer. GE is offering a rebate on the purchase of a new dishwasher, | |||
$200 for GE Profile™ dishwashers and $400 for GE Monogram® dishwashers. You will need to mail in the rebate | |||
form along with the model tag off your current dishwasher and the receipt showing the purchase of the new | |||
dishwasher prior to receiving the rebate. | |||
Download rebate form | |||
http://www.geappliances.com/products/recall/dishwasher_2010/dishwasher_2010_rebate_form.pdf | |||
2. Schedule free repair service for your dishwasher. | |||
</pre> | |||
Neither one of those steps is likely to help resolve the current symptom. Well, not unless we want to spend $1000. So the recall should be dealt with, but later. | |||
Moving ahead with replacing the recalled dishwasher. This model looks like a likely replacement | |||
http://www.homedepot.com/p/GE-Profile-Top-Control-Dishwasher-in-Stainless-Steel-with-Stainless-Steel-Tub-PDT750SSFSS/204417268 | |||
Home Depot doesn't carry the Monogram line. Standard Appliance doesn't list prices on their website. | |||
==== Diagnostic resources==== | |||
GE provides maintenance videos: | |||
* http://www.geappliances.com/videos/dishwasher-troubleshooting-fix.htm | |||
The closest video to our problem is "Poor wash due to blocked pump". However the video only demonstrates how to pull lettuce from the bottom of the dishwasher tub (around part 506 below) without any disassembly. That step only helped when I was removing broken glass from the bottom of the tub. | |||
==== Theory #1 and remediation ==== | |||
[[File:dishwasher-diagram.png]][[File:sump.jpg]] | |||
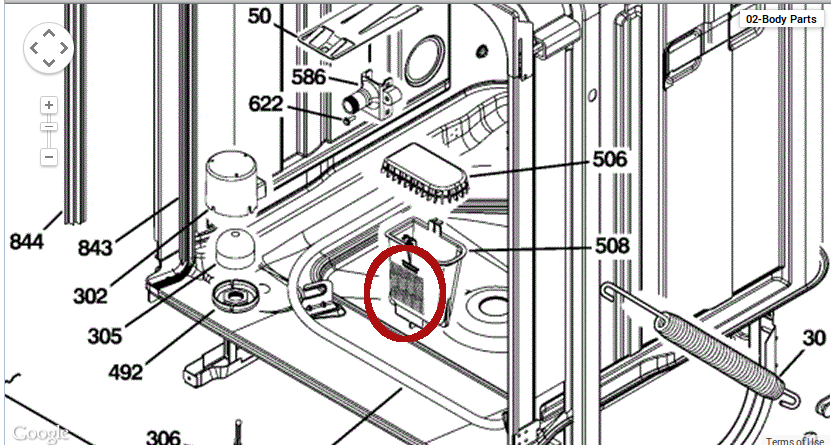
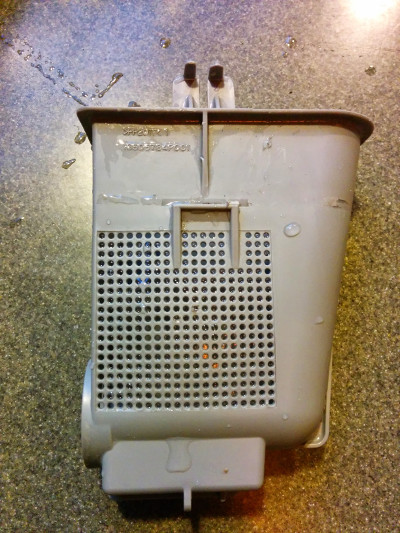
The GE video about poor wash performance indicated that parts 506 and 508 are resposible for pumping food particles out of the washer. If they are blocked, then food particles would be distributed around during the wash and not removed, which is one of the symptoms we have. | |||
To test this, I reached in and scraped quite a bit of hair and fuzz from the screen that is part of 508. The red circle indicates where I cleared the small holes in the plastic sump filter. | |||
It looks like the sump filter part we have has been replaced by [https://www.geapplianceparts.com/store/parts/spec/WD22X10077 a new sump filter] | |||
{| border="0" cellspacing="0" cellpadding="5" align="left" | |||
|[[File:drain1.jpg]] | |||
| This picture shows the pipe that carries water up to the spinning arms for the upper tray that gets clogged. And you can see the metal jar lid that I used to wedge the pipe for a tighter seal. The bottom end of that pipe seemed loose, which seemed like a way for food debris to get piped up into the upper arm. | |||
|- | |||
|[[File:drain2.jpg]] | |||
|After removing the lower spin arm, you can see food debris inside the pipe that leads to the middle spray arm. And pieces of food sitting on the metal screen. You can also see the damage to the white, flexible tube that may also be allowing food debris to recirculate. | |||
|- | |||
|[[File:drain3.jpg]] | |||
|After removing the connector at the bottom of the pipe, it is possible to remove the plastic cage (part 506) and get access to part 508 which did not contain any noticable food debris, but did seem to have hair and fuzz plugging the small holes in the side of part 508. Notice the damage to the white flexible hose. | |||
Part 508 is labeled [http://www.appliancepartspros.com/ge-filter-sump-and-wd22x10077-ap4484685.html Filter sump and cover assembly] | |||
|- | |||
|[[File:pump-diagram.jpg]] | |||
|The schematic for the parts underneath the metal screen show two pumps: part 325 and part 310. The clogged screen on part 508 corresponds with the port on part 505 that leads toward part 452 and pump 310. There are two hoses (the smooth one that resembles a white garden hose (part 463) labeled drain tube assembly, and the crinkly plastic one (part 462) labeled drain hose. | |||
Part 325 is labeled pump drain assembly and is about $60 to replace. | |||
Part 310 is labeled mechanism assembly and is about $370 to replace (the comments call this part the [http://www.appliancepartspros.com/ge-mechanism-asm-wd26x10015-ap3192237.html circulation motor]). | |||
|} | |||
==== Theory #1 results ==== | |||
Wash performance appears improved, but I'm convinced that there are still problems. | |||
Some clogs remain, and some parts appear broken. | |||
==== Theory #2 and remediation ==== | |||
Further disassembly is required to clear out more clogs and possibly replace sump parts. Basically, Harry convinced me to get serious about disassembly so I can replace everything that might be broken. | |||
{| border="0" cellspacing="0" cellpadding="5" align="left" | |||
|[[File:filter-goo.jpg]] | |||
| After using a screw-driver to pry out the sump part #508, I was able to lift out the metal screen and see the underside of it and all the goo. | |||
|- | |||
|[[File:sump-damage.jpg]] | |||
| After removing part 508, the soft white rubber sump is visible. I'm particularly interested in the damage to the short piece of upright white hose. | |||
The damaged soft white rubber part is the [https://www.geapplianceparts.com/store/parts/spec/WD18X10026 part 505 sump inlet]. I now believe the damage to this part is causing the wash cycle to have less water available as it is the overflow tube that determines that maximum water level. | |||
|- | |||
|[[File:backflow.jpg]] | |||
| This is the backflow valve that was loose in the sump. It may have fallen off during disassembly or may have fallen off earlier and been part of the poor wash performance problem. | |||
|- | |||
|[[File:dishwasher-underside1.jpg]] | |||
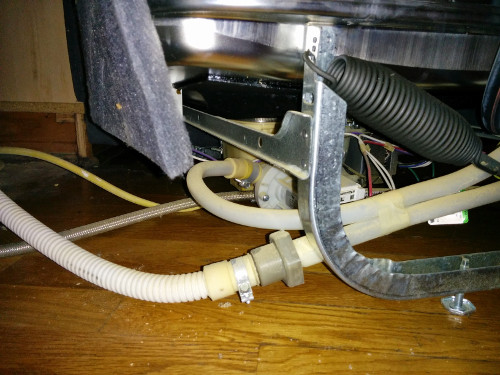
| The dishwasher is pulled away from the counter and the drain hose is visible in the foreground which loops up against the side of the washer and back down. The water feed hose is the braided silver hose. The yellow wire is the power cable. | |||
|- | |||
|[[File:dishwasher-underside2.jpg]] | |||
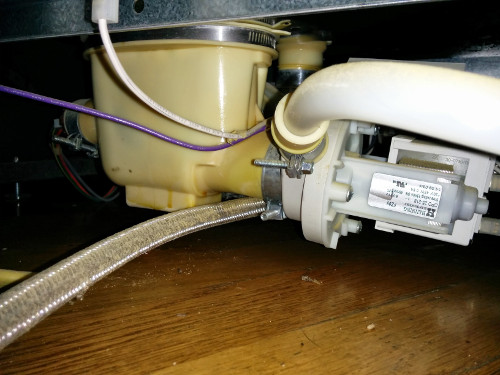
| View of the sump from behind with the drain hose on right and the water feed hose on the left. | |||
|- | |||
|[[File:dishwasher-tipped1.jpg]] | |||
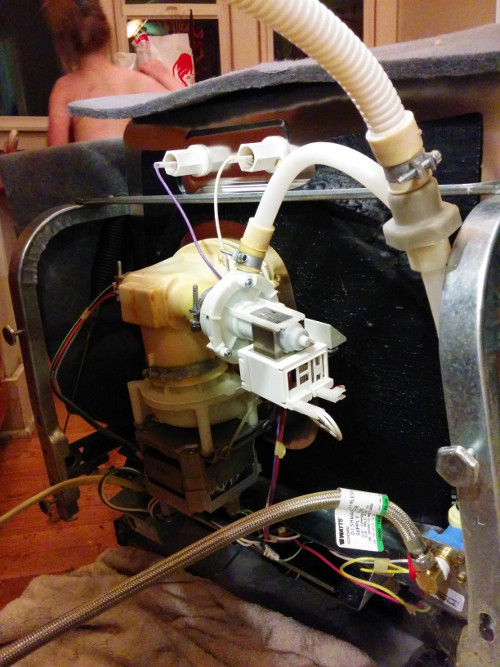
| After tipping the washer onto its face, I have access to the sump and motors. A few pints of water spilled out when I tipped it like this. | |||
|- | |||
|[[File:dishwasher-tipped2.jpg]] | |||
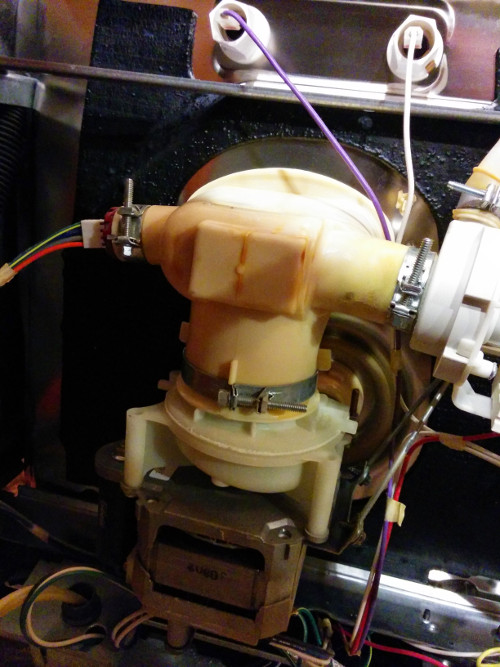
| Here is a close up of the sump which I want to replace. The sump port leading down goes to the circulation pump. The sump port leading to the right is the drain pump. The sump port leading to the left leads to some unknown sensor. I couldn't find it on the GE parts schematic for this model. | |||
|} | |||
====Replacement parts==== | |||
Ordered replacement parts from GE https://www.geapplianceparts.com | |||
{| | |||
!Item | |||
!Quantity | |||
!Unit Price | |||
!Total | |||
|- | |||
|Dishwasher sump inlet WD18X10026 | |||
|1 | |||
|$34.25 | |||
|$34.25 | |||
|- | |||
|Dishwasher Silverware basket WD28X10128 | |||
|1 | |||
|$28.00 | |||
|$28.00 | |||
|- | |||
|Dishwasher filter and sump cover WD22X10077 | |||
|1 | |||
|$41.00 | |||
|$41.00 | |||
|} | |||
====Parts arrive==== | |||
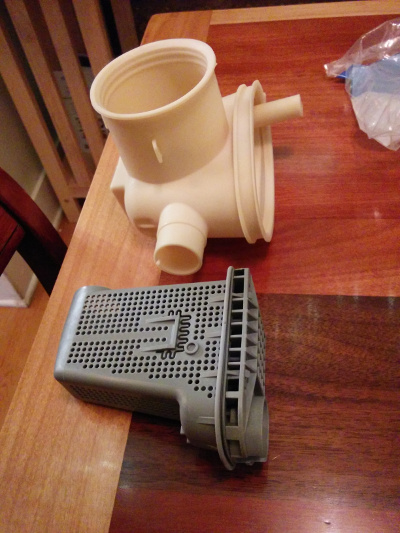
The sump and sump cover arrive, but the replacement basket is coming separately. | |||
Look at that shiny new sump and compare to the damaged sump lower down. | |||
[[File:newparts.jpg]] | |||
====Replacement==== | |||
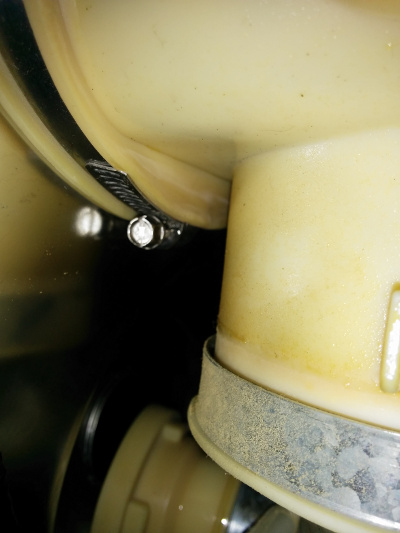
It took longer than I hoped to get all the hose clamps off the sump and swap the part. The picture below is of the fourth sump clamp. The first three are obvious and easily accessible. The biggest was tucked away and required a smallish screwdriver to release. | |||
[[File:sumpclamp.jpg]] | |||
A lot of the problem was trying to figure out how to mount the backflow valve which doesn't really attach to anything, but is just held in place by adjacent parts. | |||
The old sump was sticky to the touch as the plastic was deteriorating. It felt like some super strong chemical was used in the dishwasher that was causing the sump to break down. | |||
[[File:sumpdamage.jpg]] | |||
====Results==== | |||
The wash performance is better after the first 2 or 3 washes. I don't see food particles on the bottom screen after a wash. The top rack is cleaner, without soap particles on the glasses. The spray arms haven't been clogged at the end of a wash. | |||
But I want to see at least 10 good washes before I'll call it fixed. | |||
After about a hundred washes, I've only had to clean the middle spray arm once. So I'd say that the fix is good. | |||
====Symptom==== | |||
After replacing the sump, the backflow valve came loose and was caught in the pump that grinds food and removes water. The backflow valve was only about 80% destroyed and probably did damage to the pump. Now the drain pump make a loud vibration that can be heard and felt throughout the house. | |||
I tried installing carpet pads under the dishwasher feet to isolate the vibration, but it still travels through the house and I can feel it in the basement floor and in other places far from the kitchen. | |||
I'm afraid that to fix that, we'll need a new pump which is likely one of the most expensive parts. | |||
---- | |||
===We finally give up and buy a new dishwasher=== | |||
Latest revision as of 19:32, 21 December 2017
Dish washer troubleshooting
Symptom
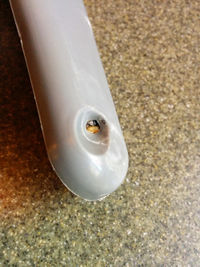
The dish washer mostly works. However, it frequently will fail to wash the top rack. Furthermore, the dishes on both racks sometimes come out dirtier than when they went in. When this happens, I can take off the rotating spray arms which will be clogged with food particles. There are three spray arms: the largest is on the bottom, below all the dishes, one between the two racks, and the smallest one above all the dishes. The clog is generally at the end of the arm in the jet that should provide the force to spin the arm. These clogs happen after almost every wash.
|
A clog in the middle spray arm that normally shoots up into the top rack. |
|
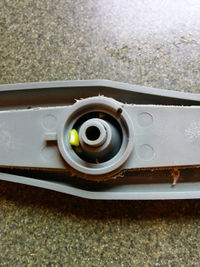
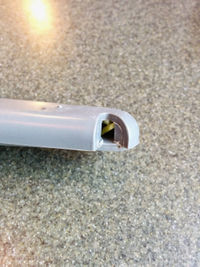
The top-most spray arm clogged with food. This spray arm is the most difficult to remove as it requires a 1/4 inch wrench. |
With some effort the clogs can be removed and the top rack will get cleaned again. But the real problem is that food chunks are not getting filtered out properly.
I've tried to fix this before, and my first round of googling turned up the possible cause of broken glass in the bottom of the dish washer. And that was true. I cleaned out a bunch of broken glass. But that didn't fix the problem.
We've even called out a service tech and spent a bunch of money for him to clean the filter at the bottom (removing a bunch of paper stickers like the kind that are on fruit from the grocery store). But that didn't fix the problem.
Make and model
- Model: PDW9280J00SS
- Serial: VF821142B
Parts
- Sears Parts has diagrams and parts lists online:
- GE has an official parts page for this model of dishwasher:
https://www.geapplianceparts.com/store/parts/assembly/PDW9280J00SS
Recall
A quick search shows that our model is part of a recall: http://www.cpsc.gov/en/Recalls/2011/GE-Recalls-Dishwashers-Due-to-Fire-Hazard/
Filling out this form: http://www.geappliances.com/products/recall/dishwasher_2010/ We get this message:
Safety Recall

GE Dishwashers - October 2010 Recall

Your dishwasher is included in the recall.

Based on the information you submitted, you have two options (please choose one):

1. Replace your dishwasher using a GE rebate offer. GE is offering a rebate on the purchase of a new dishwasher,
$200 for GE Profile™ dishwashers and $400 for GE Monogram® dishwashers. You will need to mail in the rebate
form along with the model tag off your current dishwasher and the receipt showing the purchase of the new
dishwasher prior to receiving the rebate.

  Download rebate form

http://www.geappliances.com/products/recall/dishwasher_2010/dishwasher_2010_rebate_form.pdf

2. Schedule free repair service for your dishwasher.
Neither one of those steps is likely to help resolve the current symptom. Well, not unless we want to spend $1000. So the recall should be dealt with, but later.
Moving ahead with replacing the recalled dishwasher. This model looks like a likely replacement
http://www.homedepot.com/p/GE-Profile-Top-Control-Dishwasher-in-Stainless-Steel-with-Stainless-Steel-Tub-PDT750SSFSS/204417268
Home Depot doesn't carry the Monogram line. Standard Appliance doesn't list prices on their website.
Diagnostic resources
GE provides maintenance videos:
The closest video to our problem is "Poor wash due to blocked pump". However the video only demonstrates how to pull lettuce from the bottom of the dishwasher tub (around part 506 below) without any disassembly. That step only helped when I was removing broken glass from the bottom of the tub.
Theory #1 and remediation
The GE video about poor wash performance indicated that parts 506 and 508 are resposible for pumping food particles out of the washer. If they are blocked, then food particles would be distributed around during the wash and not removed, which is one of the symptoms we have.
To test this, I reached in and scraped quite a bit of hair and fuzz from the screen that is part of 508. The red circle indicates where I cleared the small holes in the plastic sump filter.
It looks like the sump filter part we have has been replaced by a new sump filter
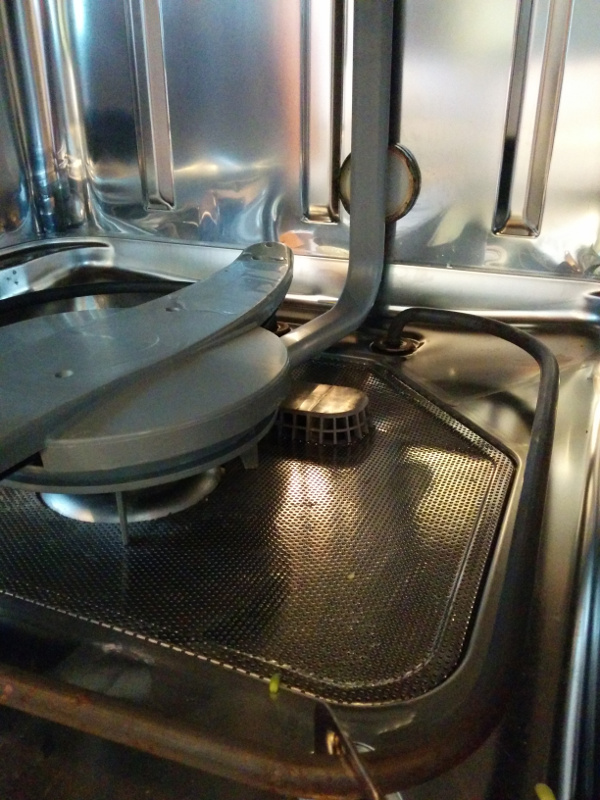
|
This picture shows the pipe that carries water up to the spinning arms for the upper tray that gets clogged. And you can see the metal jar lid that I used to wedge the pipe for a tighter seal. The bottom end of that pipe seemed loose, which seemed like a way for food debris to get piped up into the upper arm. |
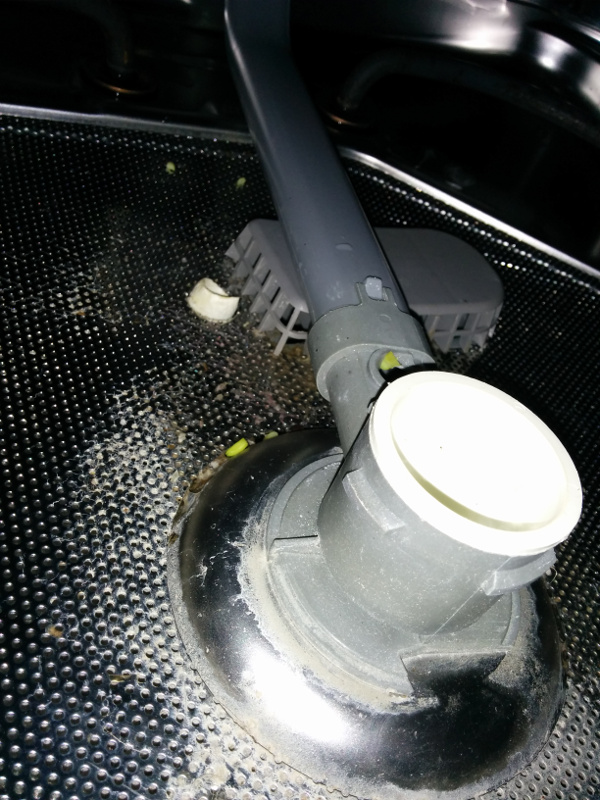
|
After removing the lower spin arm, you can see food debris inside the pipe that leads to the middle spray arm. And pieces of food sitting on the metal screen. You can also see the damage to the white, flexible tube that may also be allowing food debris to recirculate. |
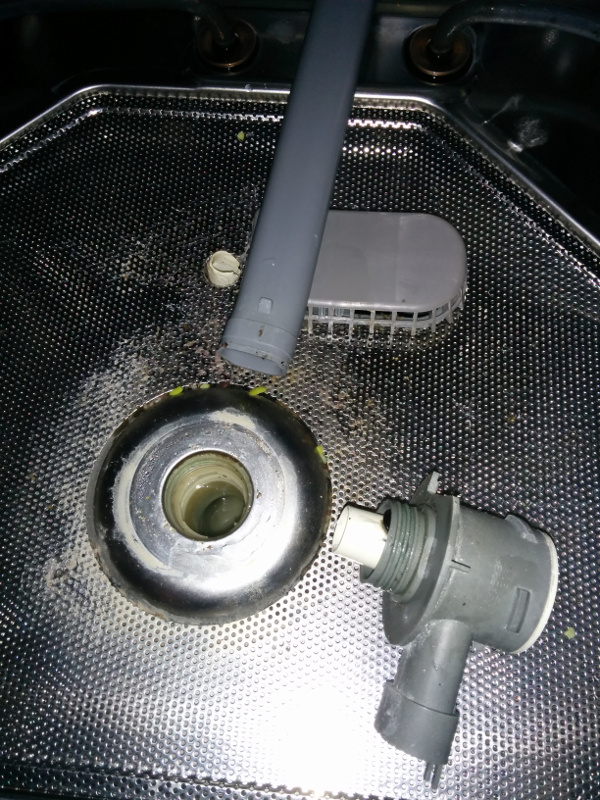
|
After removing the connector at the bottom of the pipe, it is possible to remove the plastic cage (part 506) and get access to part 508 which did not contain any noticable food debris, but did seem to have hair and fuzz plugging the small holes in the side of part 508. Notice the damage to the white flexible hose.
Part 508 is labeled Filter sump and cover assembly |
|
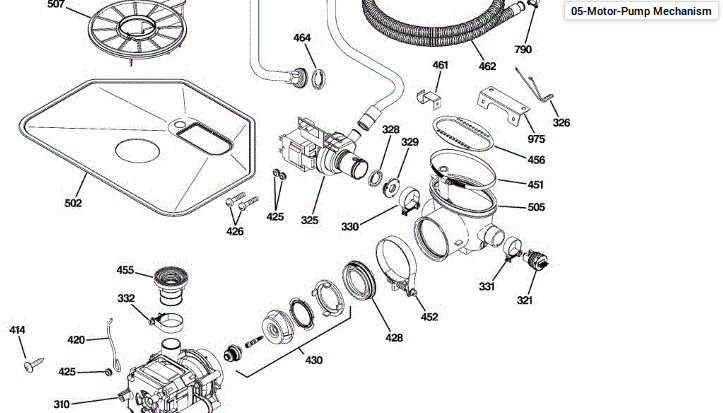
The schematic for the parts underneath the metal screen show two pumps: part 325 and part 310. The clogged screen on part 508 corresponds with the port on part 505 that leads toward part 452 and pump 310. There are two hoses (the smooth one that resembles a white garden hose (part 463) labeled drain tube assembly, and the crinkly plastic one (part 462) labeled drain hose.
Part 325 is labeled pump drain assembly and is about $60 to replace. Part 310 is labeled mechanism assembly and is about $370 to replace (the comments call this part the circulation motor). |
Theory #1 results
Wash performance appears improved, but I'm convinced that there are still problems. Some clogs remain, and some parts appear broken.
Theory #2 and remediation
Further disassembly is required to clear out more clogs and possibly replace sump parts. Basically, Harry convinced me to get serious about disassembly so I can replace everything that might be broken.
|
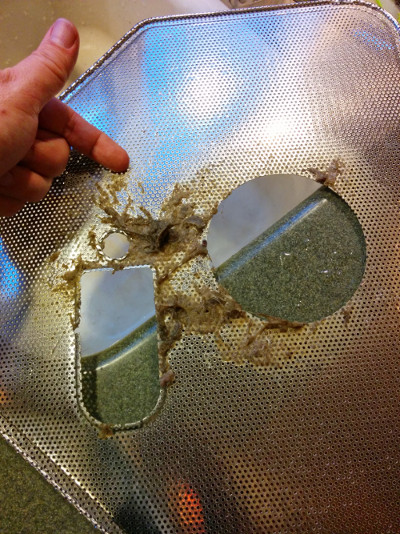
After using a screw-driver to pry out the sump part #508, I was able to lift out the metal screen and see the underside of it and all the goo. |
|
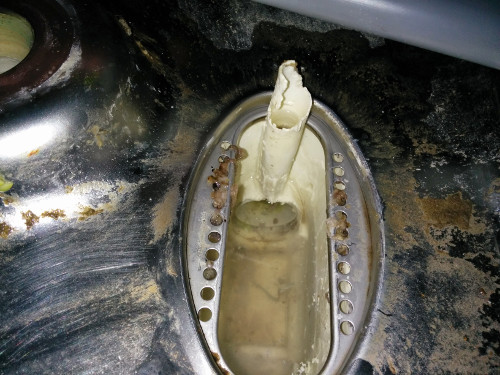
After removing part 508, the soft white rubber sump is visible. I'm particularly interested in the damage to the short piece of upright white hose.
The damaged soft white rubber part is the part 505 sump inlet. I now believe the damage to this part is causing the wash cycle to have less water available as it is the overflow tube that determines that maximum water level. |
|
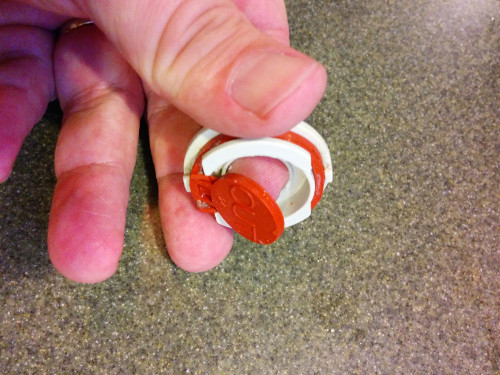
This is the backflow valve that was loose in the sump. It may have fallen off during disassembly or may have fallen off earlier and been part of the poor wash performance problem. |
|
The dishwasher is pulled away from the counter and the drain hose is visible in the foreground which loops up against the side of the washer and back down. The water feed hose is the braided silver hose. The yellow wire is the power cable. |
|
View of the sump from behind with the drain hose on right and the water feed hose on the left. |
|
After tipping the washer onto its face, I have access to the sump and motors. A few pints of water spilled out when I tipped it like this. |
|
Here is a close up of the sump which I want to replace. The sump port leading down goes to the circulation pump. The sump port leading to the right is the drain pump. The sump port leading to the left leads to some unknown sensor. I couldn't find it on the GE parts schematic for this model. |
Replacement parts
Ordered replacement parts from GE https://www.geapplianceparts.com
| Item | Quantity | Unit Price | Total |
|---|---|---|---|
| Dishwasher sump inlet WD18X10026 | 1 | $34.25 | $34.25 |
| Dishwasher Silverware basket WD28X10128 | 1 | $28.00 | $28.00 |
| Dishwasher filter and sump cover WD22X10077 | 1 | $41.00 | $41.00 |
Parts arrive
The sump and sump cover arrive, but the replacement basket is coming separately.
Look at that shiny new sump and compare to the damaged sump lower down.
Replacement
It took longer than I hoped to get all the hose clamps off the sump and swap the part. The picture below is of the fourth sump clamp. The first three are obvious and easily accessible. The biggest was tucked away and required a smallish screwdriver to release.
A lot of the problem was trying to figure out how to mount the backflow valve which doesn't really attach to anything, but is just held in place by adjacent parts.
The old sump was sticky to the touch as the plastic was deteriorating. It felt like some super strong chemical was used in the dishwasher that was causing the sump to break down.
Results
The wash performance is better after the first 2 or 3 washes. I don't see food particles on the bottom screen after a wash. The top rack is cleaner, without soap particles on the glasses. The spray arms haven't been clogged at the end of a wash.
But I want to see at least 10 good washes before I'll call it fixed.
After about a hundred washes, I've only had to clean the middle spray arm once. So I'd say that the fix is good.
Symptom
After replacing the sump, the backflow valve came loose and was caught in the pump that grinds food and removes water. The backflow valve was only about 80% destroyed and probably did damage to the pump. Now the drain pump make a loud vibration that can be heard and felt throughout the house.
I tried installing carpet pads under the dishwasher feet to isolate the vibration, but it still travels through the house and I can feel it in the basement floor and in other places far from the kitchen.
I'm afraid that to fix that, we'll need a new pump which is likely one of the most expensive parts.

